Screed Hatch: Setting Out Floor Build-Ups That Read Clearly.
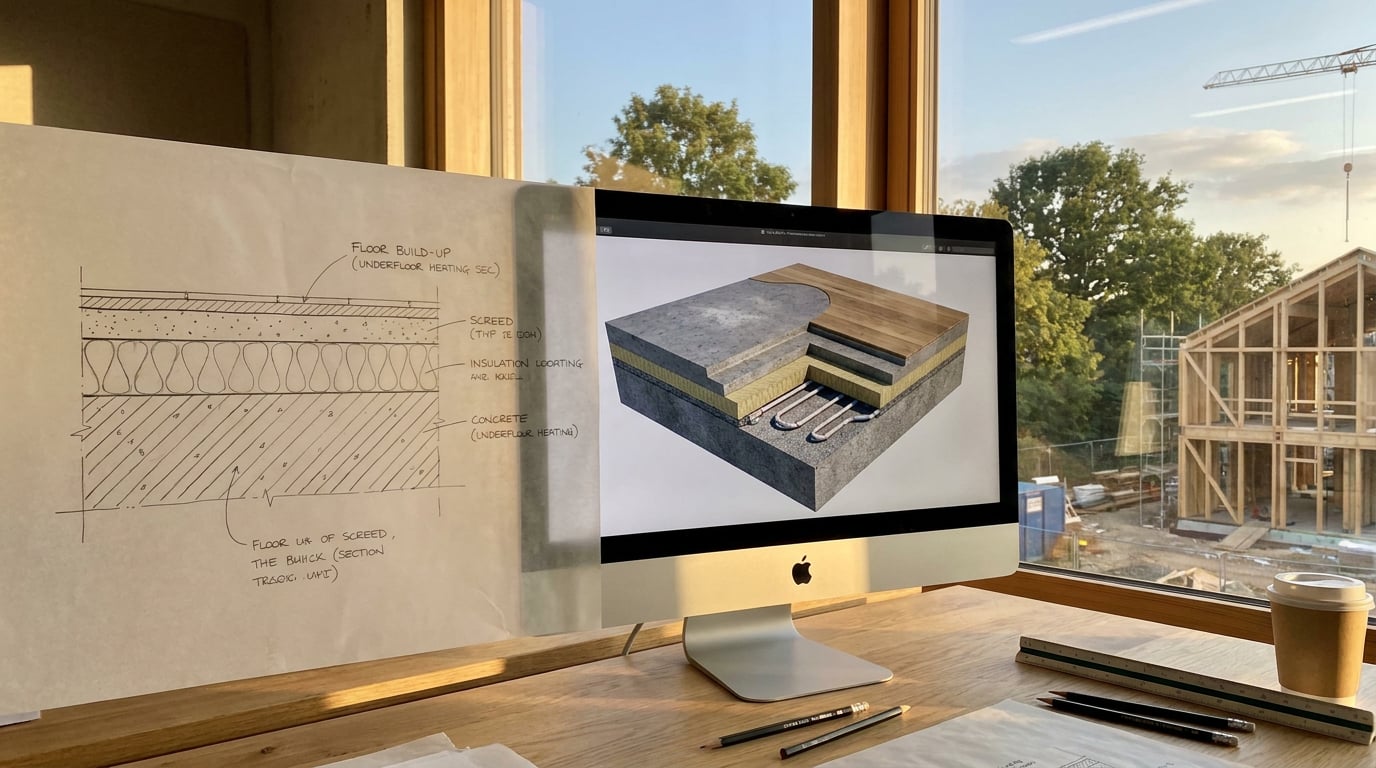
A screed hatch is a small decision that tells a contractor exactly what is under their feet. Here is how to choose, scale and place one so it reads on every sheet.
What a Screed Hatch Has to Say
 Screed sits between structure and finish, so its hatch has one job: separate the material below from the material above. If it looks the same as the concrete slab, or the same as the floor finish, the build-up reads as one lump and the reader has to guess where the layers change.
Most practices work to a loose set of conventions. These are practice conventions, not a universal standard, so treat the list below as a starting point and check it against your office standard or the drafting standard your project works to.
- Sand-cement screed: a fine, random stipple or dot pattern.
- Concrete slab: a heavier aggregate pattern, coarser and more varied.
- Floor finish: a clean light fill, or no hatch at all, with the line doing the work.
A hatch says "this is screed". A note says "65mm sand-cement screed over insulation". You need both on the sheet.
Matching Hatch Density to Drawing Scale
 Hatch pattern scale and drawing scale are separate settings. This is the single most common cause of a hatch that looks wrong. A stipple tuned to look right at 1:5 turns into a solid grey smear at 1:20, because the dots have not shrunk to match. Go the other way and a pattern tuned for 1:50 looks empty and washed out when it is enlarged to a 1:5 detail.
The fix is to set the pattern scale per viewport or per detail, not once for the whole file. A section at 1:50 and a junction detail at 1:5 want different pattern scales even though the material, and the pattern family, are identical.
### Check the hatch against the thickness it fills
Do the arithmetic before you pick a pattern scale. A 65mm screed drawn at 1:20 is 65 ÷ 20 = 3.25mm tall on paper. That is a thin strip. A coarse pattern with a repeat of 5mm will not complete even one cycle inside it, so it reads as noise rather than texture. At that height you need either a fine pattern or a plain tint, with the leader note carrying the identification.
| Screed thickness | Scale | Height on paper | What reads |
|---|---|---|---|
| 65mm | 1:5 | 13mm | Room for a clear stipple with several repeats |
| 65mm | 1:20 | 3.25mm | Fine stipple or light tint only |
| 65mm | 1:50 | 1.3mm | Tint or solid fill; pattern will not show |
Change the pattern scale between sheets, never the pattern itself. One material, one pattern family.
Layer, Lineweight and Fill Setup in Linea and Vector
 How you set up the drawing matters as much as how you hatch it. The same discipline applies in both ArchAdemia tools, with slightly different mechanics.
### In Linea
Hatches in Linea are real 2D drafting on the plan. The Hatch tool sits alongside Line, Polyline, Rectangle, Circle, Arc, Text, Leader and Revision cloud, and it works on both of Linea's kinds of drafting line: model lines, which are real at the level's elevation in 3D, and detail lines, which are plan-only.
Put each material on its own named layer. Linea lets you give a layer its own colour, weight and linetype, and any kind of drafting object can go on a layer, not just lines. The practical payoff is control. With screed on its own layer, you can hide it, recolour it or set it not to plot without touching the walls or the slab.
Detail lines and hatches are plan-only, so a screed hatch drawn that way annotates the drawing without changing the 3D model. That makes them the right place for build-up detail. For the layered build-up itself, keep it in the modelled floor type, where it belongs as part of the building. Use drafting for the explanation and the model for the construction.
### In Vector
Vector treats a hatch as plain, editable linework and fills. If you bring in a PDF export or a CAD file, the pre-import report shows what is about to arrive, including large hatched areas that the importer offers as real fills. You can accept or decline each one before anything is created. For screed, accepting is usually the right call: a solid fill set to Multiply keeps the linework underneath visible through the colour. Multiply is one of six item blend modes in the Appearance block, and it is carried into PDF, SVG and PNG exports.
### Set lineweights deliberately
Weight is where a section earns its hierarchy. Use a heavy cut line for the section profile, and a lighter weight for the hatch pattern itself, so the pattern never competes with the outline. Vector gives you ISO pen-weight presets for this, so use them rather than eyeballing a number. The cut line should be the first thing the eye finds, the hatch the second.
### Export decides what survives
What you send out is not always what you drew. A DXF export carries geometry and layers but no fills or gradients, so a hatch that depends on a tinted fill will lose it. Before you send a detail to a consultant, check that the hatch still reads as linework alone. If the stipple is made of real linework it survives, and if it was a fill it will not.
Put every material on its own layer, hatch lighter than the cut line, and check the drawing still reads as linework before you send a DXF.
Hatching Mixed Floor Build-Ups at Junctions
A single layer is easy. The difficulty arrives at the junctions: screed stopping at a threshold, a movement joint, a thickened slab edge, a step between two finish levels. These are the places where a build-up changes, and where a lazy hatch gives the game away. Draw the hatch to the actual edge and let it stop where the material stops. Do not run a screed pattern under a door threshold because it was quicker to drag one rectangle across the opening. If the screed ends at the threshold, the hatch ends at the threshold, and the change in build-up on the other side is shown in its own right. ### Make the order readable without the key Give insulation, screed and slab clearly different patterns, then look at the section and ask whether the order reads top to bottom without consulting the key. If you have to decode it, the contrast is too low. Insulation is typically drawn in a lighter, more open pattern than the dense slab, with the screed sitting between them in tone. Squint at the printed sheet: you should see three distinct bands. A quick comparison for a floating floor over a ground-bearing slab, reading top to bottom:- Floor finish: clean light fill or none.
- Screed: fine stipple.
- Insulation: open, lighter pattern, visibly different from the screed.
- Slab: heavy aggregate pattern.
Draw the hatch to the real edge, close every boundary, and keep section hatches on their own layer so a model change cannot leave a stale one behind.
Annotating and Issuing the Sheet
A good hatch with no annotation is half a drawing. Pair every screed hatch with a leader note stating thickness and type, for example: 65mm sand-cement screed over insulation. In Linea, the Leader and Text tools handle this directly on the plan. On a standalone detail in Vector, the Type tool does the same job, with point text for a short note and an area frame for a longer one. ### Add a build-up key A short key on the sheet, matching each pattern to its material, beats relying on convention alone. This matters most for planning submissions and tender sets, where the reader is not on your team and has no way of knowing your office's habits. A four-row table is enough: swatch, material, thickness where it is constant. It costs a few square centimetres of sheet and saves a round of clarification questions. ### Set the real scale before you plot Plotted scale is a calibration problem, and it is worth ten minutes before you export. In Vector, set the drawing scale from a standard ratio, or calibrate against a known distance, so the rulers and the scale bar read true real-world units. The rulers regenerate against the scale you set, which means a 42mm line at 1:100 reads as 4.2m. In Linea, export the sheet as a PDF at a true plotted scale on a chosen paper size, with the title block in place. ### The final check before issue Run through this on the printed or 100 percent view, not on a zoomed screen:- The screed reads as distinct from both slab and finish.
- The leader note matches the build-up in the model or schedule.
- No hatch has gone solid, and none has disappeared.
- The same pattern means the same material on every sheet in the set.
- Any DXF going to a consultant still makes sense as linework alone.
Check the sheet at plotted size before you issue it. One print saves one query from site.
Keep reading.
Try ArchAdemia Tools for yourself
Draw it, model it, render it, publish it. One place, built for architects and small practices. From £19 a month, all in.